Quickstart
Five steps from zero to a MetaHuman that answers you out loud.
This guide takes you from an empty project to a fully conversational character — one you can look in the eye, speak to, and get a spoken answer back from in real time. The whole path is deliberately short: you build the character's brain in the browser, drop one plugin into your project, and wire up a handful of nodes. No servers to stand up, no models to train, no audio pipeline to assemble by hand.
Budget about 15 minutes for your first character. Everything you configure in the panel — personality, voice, language, the AI model behind it — is live-editable afterward without touching the project, so you can iterate on behavior long after the wiring is done.
What you'll need
- An Unreal Engine project (a fresh MetaHuman sample project is perfect for your first run).
- A character in your level with a face capable of morph-target animation — a MetaHuman works out of the box; custom characters are supported via blend-shape mapping.
- A microphone, and speakers or headphones.
- A free IAMX account — created in the first step below.
The five steps
- Create a free account — Go to iamx.live and sign up. The free tier is enough to build a character and run real conversations while you're getting started; you can raise limits later without changing any code. Your account is the control plane for everything that follows — characters, voices, models, and usage all live here.
- Build a character in the panel — In the dashboard, create a new character and give it a personality (the system prompt / backstory that defines who it is and how it speaks), a voice, a primary language, and the AI model that drives its replies — GPT, Claude, Gemini, or a local Ollama model. When you save, the panel issues a connection ID. Copy it — that single string is the only thing your Unreal project needs to come alive. Full walkthrough in The Panel.
- Install the plugin — Download the package that matches your engine version from the releases page, unzip it, and drop the
IAMXfolder into your project'sPlugins/directory (create the folder if it doesn't exist yet). Restart the editor and enable the plugin if prompted. Step-by-step details, including engine-version notes, live in Install the plugin. - Wire it up — On your character's Blueprint, add the IAMX component and paste your connection ID into it. Open the face AnimGraph and add the three animation nodes so the character can move while it talks and stay engaged with you:
IAMX Lip Sync— drives the mouth from the spoken audio.IAMX Eye Look At— keeps the eyes on the person it's talking to.IAMX Head Look At— turns the head naturally toward the speaker.
Event BeginPlay, call Start Conversation. See The IAMX Component for every property, and Start Conversation for the connection lifecycle. - Press Play and talk — Hit Play in the editor. Hold the push-to-talk key (default
T), say something, and release. The character listens, thinks, and answers you out loud — lips synced, eyes and head tracking you. That's the full loop.
T key. IAMX also supports always-listening voice activation, proximity triggers, and manual/scripted turns — switch modes on the component when you're ready. See Conversation & interaction.The connection ID at a glance
The connection ID is the seam between the two halves of IAMX. Everything on the left is configured in the browser and can change at any time; everything on the right is a one-time wiring job in your project.
| Configured in the panel (no rebuild) | Wired once in Unreal |
|---|---|
| Personality / system prompt | IAMX component + connection ID |
| Voice and language | IAMX Lip Sync node |
| AI model (GPT / Claude / Gemini / Ollama) | IAMX Eye Look At node |
| Knowledge, actions, and behavior toggles | IAMX Head Look At node |
| Usage limits and plan | Start Conversation on BeginPlay |
The minimal BeginPlay wiring
Conceptually, the entire hookup is this small. In Blueprint it's the same shape — the component holds your connection ID, and one node kicks the conversation off.
Event BeginPlay
        │
        ▼
┌───────────────────────────┐
│  IAMX Component            │
│  • Connection ID: "xxxx…"  │
└───────────────────────────┘
        │
        ▼
   Start Conversation ──► character connects, greets, and starts listening

Face AnimGraph
   Final Pose ◄─ IAMX Head Look At ◄─ IAMX Eye Look At ◄─ IAMX Lip Sync ◄─ base pose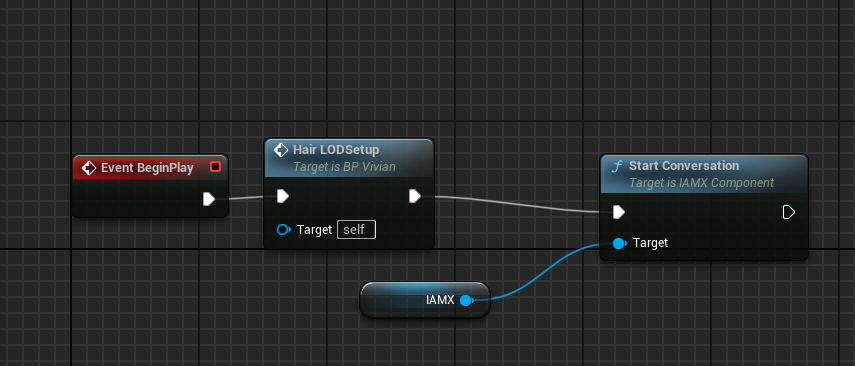
Event BeginPlay → Start Conversation, with the IAMX component wired into Target. This single wire is the step most silent characters are missing.IAMX Lip Sync feeds into the pose that reaches the final output, not a branch that's blended out. If the character stays silent entirely, re-check that the connection ID is pasted exactly and that Start Conversation is actually firing from BeginPlay.Verify it's working
Use this quick checklist to confirm each part of the loop before moving on:
It hears you
Hold T and speak — the character should stop and listen. If it never reacts, check your OS default microphone and that the app has mic permission.
It answers
On release, you should hear a spoken reply in the voice you picked. No audio means the voice or model isn't set on the character in the panel.
It's alive
Lips move in sync, and the eyes and head track you. If the audio plays but the face is frozen, revisit the three AnimGraph nodes.
Next steps
You've got a talking character. Now make it yours — give it deeper knowledge, richer behavior, and the ability to actually do things.
The Panel
Shape personality, voice and language, choose your AI model, and manage characters and usage — all from the browser.
Unreal plugin
Pick the right package for your engine version, enable the plugin, and get the IAMX folder into your project cleanly.
Features
Explore conversation modes, knowledge, actions, vision, and everything a character can do beyond a single reply.
Stuck or want to show off what you built? Ask questions on the community forum, read deep-dives on the blog, or browse the source and file issues on GitHub.